Showing posts with label nail design. Show all posts

Tuesday, May 27, 2014

Rainbow Gradient with Nail Foils

OMG it worked this time.  My last post (which was way too long ago) was a total nail fail but it was supposed to look like this.  I wanted to re-create it because I knew it was going to be awesome and I was right.  Totally awesome!
I started with all the gradients first and then let them dry.  Then I applied the foil glue using a fan brush but this time much less generously.  Then when it dried I used the dotted holographic foil from Born Pretty Store and there you have it.  I'm sure you're all wondering what polish I used and since it's a lot, I'm going to just make a list going from pinky to thumb.  I know you can't see my thumb but it's a yellow, coral, pink combo. Here they are:

Zoya Malia
Color Club Lavendarling
Color Club Hydrangea Kiss
Orly Snowcone
Color Club Blue-ming
Pop Loud Lime
Sinful Unicorn
Zoya Pippa
Jesse's Girl Julie G All Things Girly
Julep Reese

So there you have it.  Now I say this all the time, but this time I mean it...I am swatching and trying to come up with great nail art to keep the blog going.  I actually did swatch a few colors and I just haven't posted them because looking back at them, I thought they were really bad.  I had two chipped nails and so they were super short and just gross.  lol So keep coming back.  I know I'm trying to. (:

Tuesday, May 6, 2014

Dark Rose Mani

Hey Everyone!  I can't wait to show you all this mani.  I don't even know how I came up with it, but it's so ME!  Let's check it out!
I started with two coats of a sparkly dark grey that I mixed myself awhile ago.  Then I used Julep Joy (mauve) and Zoya Posh (red) to create the abstract roses.  Then with my go-to black creme, Sinful Black on Black, and a super skinny nail art brush I added random curved lines to make the roses look like actual roses and less like red and mauve blobs.  Then with the same black polish, I did a color block.  I also used Zoya Veruschka mixed with a little Zoya Zuza to create the perfect green leaves and then I added a matte top coat and done!

I think this is such a cool, gothic style mani with a little bit of a girly flare.  It's definitely something I would be seen in if it were a fabric.  I actually used to have a dress that sort of looked like this but I lost it.  ):  I think someone stole it to tell the truth.  Hmmm...I should look into that.

Well I hope that you all love it as much as I do.  I know it's not Spring/Summer looking but, like I said, it's so ME! (:

Sunday, May 4, 2014

Swirl Design with Nail Craze

Why yes!  That is nail art you see.  I haven't been big into nail art lately (or blogging at all actually) and especially with stamping.  It's not my forte, but I finally got my hands on a couple of Nail Craze plates and they make stamping so fun.
The design above is from the Nail Craze plate NC02.  It's the one with the unicorn and pegasus in case you don't know which one I'm talking about.  I have lots of other plates from different makers and this is by far the best one I've used.  The etches are just right so that the design lifts perfectly off the plate and onto the stamper with ease.  It transfers perfectly without any "bald spots" or lifting like I've gotten with many other plates.  The colors I used underneath are Color Club Blue-ming (mint), China Glaze Pool Party (pink), and Color Club Hydrangea Kiss (purple).  I just sponged them on individually if you wondered.  When I was dry I added one coat of China Glaze Fairy Dust and then the swirly stamp over that.  I absolutely love how it turned out and feel like it was the best way for me to ease back into nail art without too much effort.

I'm gonna try to keep this up so keep coming back.  Have a wonderful Sunday!  (:

Sunday, March 9, 2014

Zoya Stevie Skittlette

Hey Everyone!  How is your morning going?  I hope you all didn't forget to turn your clocks forward one hour?  I have all mine set to do it automatically so I hope they did or else I'll be in trouble tomorrow when I show up to work an hour late.  lol

Anyway I am so proud of myself because I was able to get so much done yesterday around my apartment and I still had time to go out and run and do a fun skittlette mani for you all.  In case you are all wondering what a skittlette manicure is exactly, I found this definition from So Nailicious.

skit·tle·tte: Not quite a full skittles look, a skittlette manicure is one with at least two different accent nails.  Pick any formation you wish, but for a true skittlette at least two nails need to be the same (the others can all be different) OR two pairs of identical nails and a different nail.

I even had to ask some friends of mine if this mani was a true skittlette.  lol
The base color I chose is two coats of Zoya Stevie.  I just received it in a swap and I love it.  I was going to post just the swatch for you today but I couldn't wait to show you the nail art so I'll save it for another day.  For the nail art I just used Sinful Color Black and Black and Zoya Purity.  For the feather and stripes I just used a striping brush and dipped it straight into the bottles and for the dots, obviously, a dotting too.  This was a super fun and easy mani.  The hard part was really just letting it dry.

I hope you all enjoyed this.  It seems like my friends really love it so get to commenting and tell me what you think!  (:


Thursday, February 13, 2014

Gal-entine's Ombre

Today's mani is really just a re-creation of a mani I did two years ago for Valentine's.  I would link you back to it but unfortunately there are no photos anymore.  Somehow when that whole "link to Google+" stuff happened, almost all of my old blog photos were deleted.  Fortunately they can still be seen on my Facebook albums but it's just not the same.  Anyway, today is February 13, which means it's GALENTINE'S DAY!

If you are unfamiliar with this amazing holiday, you should really watch Parks and Rec.  It's basically just a day to show the love, not for the man in your life, but the women in your life.  Whether it's your mom or sisters or best friend, just give a little love today.
Just like with the original mani, I used most of the same colors.  These are all Jessie's Girl Julie G polishes.  On my pinky is All Things Girly.  My ring finger is Party Dress.  The middle is Frosted Cupcake and my pointer finger is Fashion Friday.  I almost left this as is but then it wouldn't be a re-creation.  If would just be unfinished.
After everything dried, I used striping tape to create v-shapes on all my fingers.  Then using Ulta High Roller, my favorite gold for nail art, I applied one generous coat inside the v and then removed the tape.

This is a super fun and easy mani to recreate and I love that the colors make is really girly.  Let me know what you think in the comments below.  Happy Galentine's Day!!

Tuesday, February 11, 2014

My Grungy Valentine

I figured since I haven't done any Valentine's manis yet and Valentine's Day is Friday, I should probably get on the ball.  Honestly I hate Valentine's Day and the whole hype around it.  It's not because I'm single or bitter about the so-called holiday.  As I got older I just didn't like it anymore.  This makes it really easy on the boyfriend though because he doesn't have to get me anything.  lol
Since I'm not that into it, I figured doing a grungy looking mani using Valentine's appropriate colors would be a fun alternative for me.  I started by prepping my nails with one coat of Color Club Blushing Rose which is a super light baby pink creme.  Then I used the dry brushstroke technique to apply the other colors.  If you aren't familiar with this technique, basically apply the polish using the brush from the polish bottle but with almost all of the polish wiped off.  This is what creates the effect you see.  If you are looking for a great tutorial, here is one from Sarah of Chalkboard Nails.  The other colors I used were a lavender purple, Zoya Malia, and an orchid, Color Club Sweet Pea.  When it was all dry I used Sinful Black on Black to do the grungy black brushstrokes.

I hope you all enjoy this mani.  I do because I know I can wear it for more than just Valentine's Day and it's so easy to accomplish.  I think I might be able to bust out some more love-y dove-y manis before Friday so make sure you check back.  (:

Wednesday, February 5, 2014

Kleancolor Metallics Circle Gradient

My original intention for today was to use my Kleancolor Techno High metallic minis for stamping because they are known for being amazing stamping polishes, but then I decided to do something even better.  A "circle gradient".
I didn't really know what else to call it but since I applied them on the sponge in a circle pattern, that's what it became.  Like I said all of the colors are Kleancolor.  I started with a base color of Metallic Yellow and let that dry.  Then on the applied Metallic Yellow, Metallic Pink, and Metallic Jungle (teal) on the sponge and then I went to town.  I rotated the sponge to have each nail a little different.  I really love how these colors worked together.  If you look closely you can see where the secondary colors are coming through a bit.  Maybe if I had smooshed the sponge down a little more, I would have made a more prominent rainbow.
As if that weren't enough I just HAD to add some glitter.  I used Girly Bits Jini Goes Indie just for fun.

So what do you think?  Is this a super fun mani?  It sure does look like I'm prepping for Spring. (:

Friday, January 31, 2014

Metallic Matte Ruffian

So I saw this mani on Pinterest and unfortunately I can't find the original pin (because I was lame and forgot to pin it) but I saw it and loved it!  You also get a little sneak peek of the polish you can win in my giveaway.  You can find more info on that if you click through the photo in the upper right hand corner of my blog.
I started with a base of OPI Lay Down That Base because I don't think the effect will work if you don't.  Next I applied one coat of OPI Push and Shove which is the silver foil you see peeking out from under the black.  After that was dry I carefully made the ruffian design using Zoya Dovima.  Then I applied a second coat when the first was dry.  I didn't use a top coat because I didn't want to ruin the matte effect so of course this mani lasted only a day.  I still loved it though.  I just hate how my middle finger looks...short and fat.  Wah!  lol

So what do you all think?  Is this your kind of mani?  Oh and aren't you super excited that you entered to win a bottle of OPI Push and Shove (because I know you clicked the photo and went to the giveaway page, right?)  ;)

Saturday, January 4, 2014

Product Review - Born Pretty Store Round Studs

**I received this product complimentary for testing and review purposes from Born Pretty Store**

Happy Saturday Everyone!

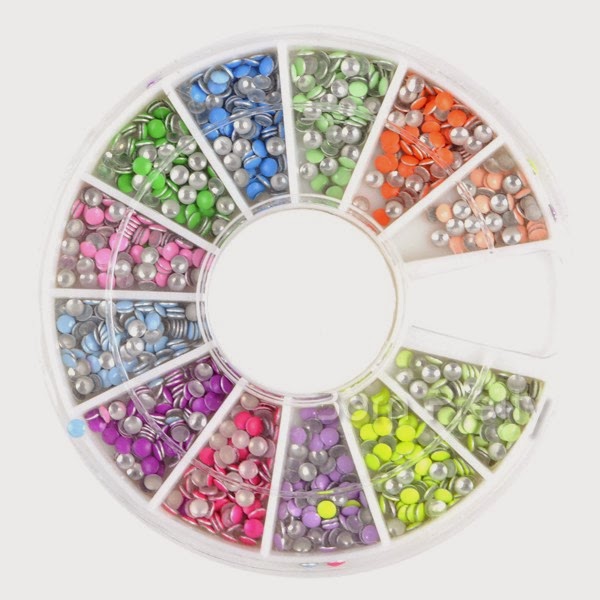
I didn't do much today because I just wanted to be lazy I guess, but I did get this post together.  Today wasn't a complete bust.  lol  I am going to review the 400pc 2mm nail studs from Born Pretty Store.
photo courtesy of bornprettystore.com
Look at all the pretty colors!!
Here is my mani using the studs.  I used Julep Meryl for my base.  I wanted to use a neutral so that the colors would really POP.  I only used four studs on each nail but in an ombre effect.  With other larger studs I've used, they tend to stick up on the sides due to the curvature of my nails which is why they don't stay on more than a couple of hours.  They just get caught on things and pop off left and right.  These are smaller at only 2mm so you can see they sit very flat on the nail.  I didn't use a top coat for the photos but I did apply one after the fact to reinforce them which definitely worked.  With my line of work, it's tough to get any type of embellishment to stay on, but these did fairly well.  I managed to keep them on an entire 24+ hours, some of them a bit longer.  I think that's pretty great considering.  If you are gentler on your hands and nails, I'm confident you could get better wear out of them.

I know I could have done a super fun, colorful mani using these, but I just really had my mind set on ombre.  If you'd like to see another mani using all the colors, check out my Christmas Day manicure.

Review Wrap-Up
Price: $ - $7.59 but right now they are 40% off which makes them $4.59.  I think the original price is a little high however it's right on par with every other nail stud packs I find at places like Sally Beauty Supply or Amazon.com.
Variety:  The choice of colors from this one wheel is awesome and they
 also come square shaped.  I can do almost any color combination so that's a thumbs up.
Quality:  Great.  They lay flat on the nail and the color doesn't peel off or fade from what I've seen.
Would I Purchase Again:  Not that I need to because this is a 400pc wheel, but yes, I would definitely buy these again.  Maybe for a fellow nail freak like me or a wheel with different shapes or colors.  If you like these studs you can purchase yours HERE.  And don't forget to use my Born Pretty Store code DRJ61 at checkout to get 10% off your order.  Once 10 orders are placed using my code, BPS will host a giveaway just for you.


Friday, December 27, 2013

Product Review - Born Pretty Store Cat Water Decals

**I received this product complimentary for testing and review purposes from Born Pretty Store**

Afternoon Everyone!

Today's post is a review of some super cute water decals.  I have reviewed them before, but this is a different design with a different outcome.  To see my first post, click HERE.
For those who don't know, water decals are basically just temporary tattoos for your nails and they apply the same way.  The instructions are also printed on the back.

1. Trim, clean, and polish the fingernails; paint the background color on the fingernails and dry it out.
2. Remove the film of product, cut out the pattern and plunge it into water 10~20 seconds (use warm water in winter).
3. Moisten the fingernails; stick the pattern in position.
4. Sop up the water with a paper towel and blow dry.
5. Apply top coat and blow dry.


To be completely honest, it's a lot more simple than the instructions even imply.  What I did was paint my nails with two coats of Sinful Unicorn and let that dry.  I chose my design and dipped it in room temperature water for literally 2 - 3 seconds.  Once you stick the design to your nail, it's almost instantly transferred.  There is no need to hold it down or rub the backing.  It's super easy.

Here we go...
uuummmm...what?  lol So this is my first attempt at using this particular design.  It transferred quickly and easily but it was backwards.  The actual details are on the other side.  So I'm gonna try again.
Hmmm.  I have come to the realization that these don't apply the same way as the cow print did.  For some reason the back of the design is not transparent.  It's white which means when the design is reversed I can't see anything.  So one last time and then I give up.
Success!  Wanna know how I did it?  I used steps 1 - 2 but instead of sticking the design to my nail in step 3, I stuck it to a nail art stamper.  Then I immediately stamped the design onto my nail and voila!
Review Wrap-Up
Price: $ - $3.99.  A great price for such adorable, realistic kitty cat designs.
Variety: There are tons of water decals in so many different designs.  You can view them all HERE.
Quality:  Just like the ones I reviewed before, the design was flush to the nail and didn't peel up.  The realism is great too.  The only thing I was not thrilled about was the decal applying backwards.
Would I Purchase Again:  Now that I know I can work around the transfer issue, yes, I would definitely purchase these again.  The designs are just way too cute to pass up and the stamping method is still easy.  If you like them you can purchase yours HERE.  And don't forget to use my Born Pretty Store code DRJ61 to get 10% off your order.  Once 10 orders are placed using my cope, BPS will host a giveaway for all of you.  You all want to win free goodies right?!

Wednesday, December 25, 2013

Merry Christmas!

Today's post is a super short one.  I want you all to spend time with your families today instead of reading my blog and I'm pretty sick so I honestly don't even want to be on the computer.  lol  I just want to lay in bed with my coffee and sulk while my lovely boyfriend waits on me hand and foot.  That's what it's all about.  Just kidding.  But really I do want to get back in the bed and sulk.  ;)
I wanted to do nails that reminded me of Christmas trees and since I didn't put one up this year I thought I'd throw one of those in there as well.  For the green I used three coats of Zoya Ivanka for full opacity.  Then on my ring finger I used Zoya Tomoko with Ivanka as the tree.  The nail studs were used to resemble colored lights on the tree.  I LOVE colored lights during the holidays.  White lights are pretty too but not as festive in my opinion.  I received the studs from Born Pretty Store for review so keep an eye out for that either this weekend of the beginning of next week.

Have a happy and safe holiday!


Related Posts Plugin for WordPress, Blogger...