Showing posts with label rainbow. Show all posts

Tuesday, May 27, 2014

Rainbow Gradient with Nail Foils

OMG it worked this time.  My last post (which was way too long ago) was a total nail fail but it was supposed to look like this.  I wanted to re-create it because I knew it was going to be awesome and I was right.  Totally awesome!
I started with all the gradients first and then let them dry.  Then I applied the foil glue using a fan brush but this time much less generously.  Then when it dried I used the dotted holographic foil from Born Pretty Store and there you have it.  I'm sure you're all wondering what polish I used and since it's a lot, I'm going to just make a list going from pinky to thumb.  I know you can't see my thumb but it's a yellow, coral, pink combo. Here they are:

Zoya Malia
Color Club Lavendarling
Color Club Hydrangea Kiss
Orly Snowcone
Color Club Blue-ming
Pop Loud Lime
Sinful Unicorn
Zoya Pippa
Jesse's Girl Julie G All Things Girly
Julep Reese

So there you have it.  Now I say this all the time, but this time I mean it...I am swatching and trying to come up with great nail art to keep the blog going.  I actually did swatch a few colors and I just haven't posted them because looking back at them, I thought they were really bad.  I had two chipped nails and so they were super short and just gross.  lol So keep coming back.  I know I'm trying to. (:

Sunday, May 18, 2014

Total Nail Fail w. Foils

Heeeeyyy!  I hate to even show you all my disappointing mani today but it's all I have.  The idea in my head was much better than the actual execution.
I started with a super fun and perfect pastel vertical gradient over all my nails.  Sadly I didn't take a photo of it because I had smudged some beyond repair.  It wasn't supposed to matter though because I was going to put the foils over it.  I brushed on the foil glue with a fan brush which was supposed to leave some space open to show the colors behind the silver foil.  Weeelllll, that didn't happen.  Apparently I brushed on too much glue so when I applied the foils, there were hardly any breaks for the rainbow to show through.  Trust that I will be re-creating this mani in the near future...like, probably this week because I know that the outcome will be some much better.  Trial and error, People!  lol

Is this really the worst mani?  Up my spirits and tell me it's not (even if that's a lie...lol) in the comments below.  (:

Sunday, February 9, 2014

Circle Gradient Tutorial

So I had a really great response to the Metallic Circle Gradient mani I did a few days ago and I was asked to do a tutorial for it.  I was hesitant at first because I've never done one, but after a few video fails I decided to go with a photo tutorial.  Feel free to share the photo on Pinterest or Facebook, wherever you want.  I did it all for you!  ♥
The reason I call it a circle gradient is because when the three primary colors I used blend together, it looks like a color wheel in my opinion.  If you look closely, or if you try this yourself, you will be able to see the secondary colors (green, purple, and orange) show up and even more so after a nice top coat.  Let's get started!

STEP 1:
Choose a yellow.  I chose Kleancolor Metallic Yellow.
STEP 2:
Choose a pink (or red if you like).  I chose Kleancolor Metallic Pink.
STEP 3:
Choose a blue.  I chose Kleancolor Metallic Jungle.
STEP 4:
Grab a triangle sponge.  You may want to cut it in half so you don't waste the whole thing.
STEP 5:
Grab some tape to make clean up a breeze.  You can use any tape you like but I like clear Scotch tape.
STEP 6:
Prep your nail with one coat of your yellow polish.  You can sponge over your bare nail, but the yellow makes the colors really pop and you can use less product.
STEP 7:
Use your tape to cover the exposed skin around your nail.  This will keep the polish off your skin.
STEP 8:
Paint all three colors, slightly overlapping, onto the sponge.  You can put them in any order you like.  A little trick I use is to lightly dampen the sponge before adding the polish.  Since it's already wet it won't soak up as much polish thus saving you product.
STEP 9:
Dab the sponge on your dry nail and push down gently to help the colors blend better.  Repeat steps 8 and 9 until you are happy with the color saturation.
STEP 10: (not shown)
While the polish still a little wet, apply your top coat and then carefully remove the tape.  If any polish did seep through and get on your skin, clean it up with a cotton swab or clean up brush and some acetone.  And there you have it.  Your very own color wheel at your fingertips...literally.  At this point you can add some glitter or stamp a pretty design over it or you can just leave it as is.  I think it will be gorgeous anyway.  (:

I hope this was super helpful and that you all enjoy recreating this mani.  If you do attempt this design, I'd love for you to share it on my Facebook page or tag me on Instagram.  Have fun!


Wednesday, February 5, 2014

Kleancolor Metallics Circle Gradient

My original intention for today was to use my Kleancolor Techno High metallic minis for stamping because they are known for being amazing stamping polishes, but then I decided to do something even better.  A "circle gradient".
I didn't really know what else to call it but since I applied them on the sponge in a circle pattern, that's what it became.  Like I said all of the colors are Kleancolor.  I started with a base color of Metallic Yellow and let that dry.  Then on the applied Metallic Yellow, Metallic Pink, and Metallic Jungle (teal) on the sponge and then I went to town.  I rotated the sponge to have each nail a little different.  I really love how these colors worked together.  If you look closely you can see where the secondary colors are coming through a bit.  Maybe if I had smooshed the sponge down a little more, I would have made a more prominent rainbow.
As if that weren't enough I just HAD to add some glitter.  I used Girly Bits Jini Goes Indie just for fun.

So what do you think?  Is this a super fun mani?  It sure does look like I'm prepping for Spring. (:

Saturday, January 4, 2014

Product Review - Born Pretty Store Round Studs

**I received this product complimentary for testing and review purposes from Born Pretty Store**

Happy Saturday Everyone!

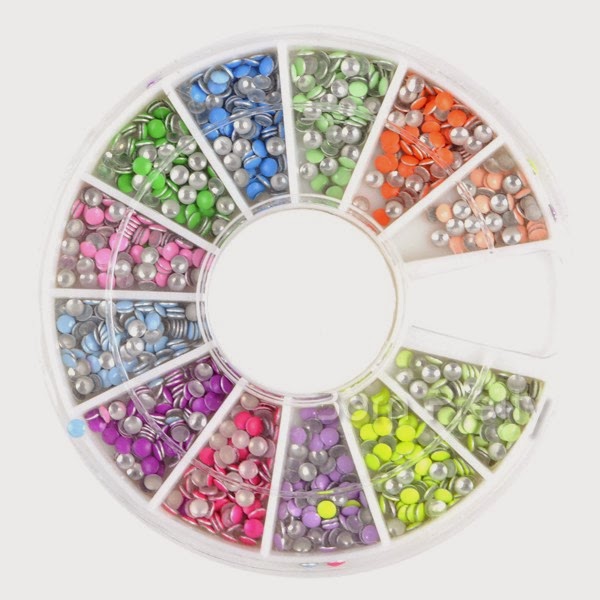
I didn't do much today because I just wanted to be lazy I guess, but I did get this post together.  Today wasn't a complete bust.  lol  I am going to review the 400pc 2mm nail studs from Born Pretty Store.
photo courtesy of bornprettystore.com
Look at all the pretty colors!!
Here is my mani using the studs.  I used Julep Meryl for my base.  I wanted to use a neutral so that the colors would really POP.  I only used four studs on each nail but in an ombre effect.  With other larger studs I've used, they tend to stick up on the sides due to the curvature of my nails which is why they don't stay on more than a couple of hours.  They just get caught on things and pop off left and right.  These are smaller at only 2mm so you can see they sit very flat on the nail.  I didn't use a top coat for the photos but I did apply one after the fact to reinforce them which definitely worked.  With my line of work, it's tough to get any type of embellishment to stay on, but these did fairly well.  I managed to keep them on an entire 24+ hours, some of them a bit longer.  I think that's pretty great considering.  If you are gentler on your hands and nails, I'm confident you could get better wear out of them.

I know I could have done a super fun, colorful mani using these, but I just really had my mind set on ombre.  If you'd like to see another mani using all the colors, check out my Christmas Day manicure.

Review Wrap-Up
Price: $ - $7.59 but right now they are 40% off which makes them $4.59.  I think the original price is a little high however it's right on par with every other nail stud packs I find at places like Sally Beauty Supply or Amazon.com.
Variety:  The choice of colors from this one wheel is awesome and they
 also come square shaped.  I can do almost any color combination so that's a thumbs up.
Quality:  Great.  They lay flat on the nail and the color doesn't peel off or fade from what I've seen.
Would I Purchase Again:  Not that I need to because this is a 400pc wheel, but yes, I would definitely buy these again.  Maybe for a fellow nail freak like me or a wheel with different shapes or colors.  If you like these studs you can purchase yours HERE.  And don't forget to use my Born Pretty Store code DRJ61 at checkout to get 10% off your order.  Once 10 orders are placed using my code, BPS will host a giveaway just for you.


Wednesday, December 25, 2013

Merry Christmas!

Today's post is a super short one.  I want you all to spend time with your families today instead of reading my blog and I'm pretty sick so I honestly don't even want to be on the computer.  lol  I just want to lay in bed with my coffee and sulk while my lovely boyfriend waits on me hand and foot.  That's what it's all about.  Just kidding.  But really I do want to get back in the bed and sulk.  ;)
I wanted to do nails that reminded me of Christmas trees and since I didn't put one up this year I thought I'd throw one of those in there as well.  For the green I used three coats of Zoya Ivanka for full opacity.  Then on my ring finger I used Zoya Tomoko with Ivanka as the tree.  The nail studs were used to resemble colored lights on the tree.  I LOVE colored lights during the holidays.  White lights are pretty too but not as festive in my opinion.  I received the studs from Born Pretty Store for review so keep an eye out for that either this weekend of the beginning of next week.

Have a happy and safe holiday!


Tuesday, November 5, 2013

Girly Bits and MakeUp Mom 123 Collaboration - Jini Goes Indie

Oh my, oh my!  I love this polish.  That's it.  I just love it!  lol I wanted since I first laid eyes on it and it's finally mine.  It is a super fun glitter collaboration by MakeUp Mom 123 and Girly Bits cosmetics.
Jini Goes Indie is packed full of different colors, shapes, and sizes of glitter and there are some surprises in the bottle.  I brushed on some butterflies and flowers and then a large black circle glitter...*o*  Yeah that one made me happy but I actually thought it was an accident.  lol  After a closer inspection, I was wrong.  The circle glitters are supposed to be in there but I wanted more...MOAR!!

Is this one of your favorite glitter polishes too?!  Let me know in the comments below.  (:

Tuesday, October 29, 2013

7 Days of Halloween - Day 5

I'm gonna be honest...I hate this mani.  lol Not because it's bad.  I actually like how it came out but because it's a clown...ugh!  Scary!  I tried to make a silly, nice clown rather than a scary one because they really freak me out, man.
I started with two coats of white and then added polka dots using Zoya Pippa - yellow,  China Glaze Kiwi Cool-ada - green, Jesse's Girl Julie G Girl's Night Out - blue, and Essie Forever Yummy - red.  Then I freehanded the clown face which I actually had to do twice.  The first time it was so cute and the lines were perfect and then I applied a quick dry top coat, however the layers were too thick so it didn't dry quick enough and I knocked my nail which smudged it to where it's unrecognizable.  So when that was done I added a cute red bow on my middle finger to represent the clown's bow tie.  And done!

This is definitely a popular costume from when I was a kid.  Eventhough I hate clowns, I was a clown too.  (:

Thursday, October 3, 2013

Darling Diva Erotic City and Wild Child

Just as promised I have swatches of the other two Darling Diva polishes that I received from the maker Carrie.  Can you believe I had to swatch them twice?  The first time I forgot to hold the bottle.  I know that seems minor but I like my photos to be consistent so, of course, that did not stand.  lol  I think my other swatches were better but it's kinda hard NOT to make polish look good when it's just as gorgeous on it's own.  So true!
First up is Erotic City.  You may remember this from my 31DC2013 post for galaxy nails where I used it as my base.  I think it looks like a galaxy even without all of the nail art on top.  Erotic City is a deep purple jelly base filled with holo micro glitter and blue opalescent hexagonal glitters.  When I first put it on, it looked like clear glitter, as if the color had bleed.  I was really sad about it until I put my hand closer to the light and that's when the blue really shined so definitely no bleeding.  I know you can see every inch of it in these photos.  I used three coats just to get rid of my VNL and the formula was a bit thick but very manageable.  
Next is my second favorite out of the four I received, Wild Child.  I mean how can you not love a rainbow glitter polish?  The base is clear but I chose to layer two coats over a grey (Julep Meryl) because I always love the contrast between neutral and neon.  The base on Wild Child is clear and there are so many different glitters in here like large pink hexes, medium blue hexes, small green hexes and squares, small pink squares, and then pink and green tiny glitter.  There is definitely a good distribution of the larger glitters so you don't have to fish them out too many times.  I think out of the two coats on each nail I only had to fish out one of them.  All the glitter seems to lay flat to my nail except the large ones but I do have pretty curved nails.  On my thumb and people with wider nails there would be no problem.

I really think these are amazing.  Carrie is such a lamb for sending these to me.  If you like what you see you can purchase them from Darling Diva's Etsy Store for just $9.00.  She also has a new collection so don't forget to check it out.  Have a great night!

Monday, September 9, 2013

31DC2013 - Rainbow

I've been wanting to do this mani for sometime and just never thought it was the right now.  But what better time than now for the 31 Day Challenge.  I wasn't sure though what day I wanted to post it.  I mean yesterday was metallic, today is rainbow, then there is gradient and after than polka dots...this mani fits them all.  lol And yes, I seriously considered cheating and posting it for all four days.  Just kidding.  haha!
So here is my super fun rainbow mani in pastel form!  I thought the silver base added something extra to it so I used one coat of Zoya Trixie and then I got all my polishes in color order ready to dot.  I also used two different sizes of dots for aesthetic...lol.
I used Sinful Colors Unicorn for the yellow, Color Club Blue-ming for the mint green, the blue is Jesse's Girl Julie G Girl's Night Out, the purple is Color Club Lavendarling, and the pink is Sinful Colors Soul Mate.  Then I just repeated the order until I reached my last nail and ran out of room.
And then of course I used a matte top coat to top it all off.  I'm addicted to matte.  I really love matte pastels and metallics, not necessarily together, but since I used them together why not?  Right?!  Now that I've exhausted this mani, I have no idea what to do for tomorrow or the next day.  If you have any ideas let me know and soon.  (:  Have a good night!

Thursday, August 22, 2013

Fun With a Pastel Gradient

I wasn't really sure what else to title this post since I have a few things going on with this mani, but it is super cute nonetheless.  Check it out!
Yeah so like I said, there is a lot going on here.  lol I wanted to do something fun and different (for me anyway) and I think is not like anything I've ever done.  I started with a white base to make the pastel colors stand out.  Then I started with the chevron nails.  I taped off the pattern using striping tape.  I could have bought some zig-zag craft scissors but that seems too easy.  I like a challenge.  (:  Then I used four different pastel cremes to gradient over the tape.  The lavender is Sinful Colors Sweet Tooth, the blue is Orly Snowcone, the yellow (which is kinda tough to see) is Sinful Colors Unicorn, and the pink is Sinful Colors Soul Mate.  I only needed two layers of sponging to get the colors almost opaque.
The I took the same colors and then Color Club Blue-ming to create gradient polka dots on my pinky and pointer fingers.  Then I topped it all off with my top coat which for some reason wanted to give me lots of bubbles today.  I really love this print and color combo but I just really hope it doesn't look like clown pants or something.  lol  I wanted it to be a little funky and a little whimsical but not ridiculous. 
So how do you all feel about this mani?  You can tell me the truth if you think it looks like clown pants.  lol I asked the boyfriend if it looked like unicorn tears and he said, "No babe!  You know unicorns cry jelly beans."  OMG I laughed to hard.  I thought you all would enjoy that.  (:

Wednesday, June 26, 2013

Water Marble Wednesday

Hooray for another Water Marble Wednesday!  I decided to do a random pattern on each nail.  I didn't even use the colors in the same order for each nail either.  They came out looking like neon wood grain to me.  lol You tell me what you think.
Oh and why did I add a bow?  I really don't know.  It was a better idea in my head and then it was stuck once I decided that it wasn't anymore.  Oh well!

WHAT I USED:
white base
Orly Oh Cabana Boy - pink
Color Club Lava Lamp - orange
popBeauty Loud Lime - green
Milani Blue Print - blue striper polish
China Glaze Creative Fantasy - purple

Wednesday, June 19, 2013

Water Marble Wednesday

Better late than never right?  I had to work a mid shift today so my morning was spent making this happen and editing the photos and what-not, and now my evening is spent writing up the post.  (:  Enjoy it!
I really liked my last weeks mani with the marble and stamping combo so I did it again.  I know there is a lot going on and I don't care.  I love it!  lol
As you can see, I only did the marble on my pinky, ring and thumb fingers.  With the other 2 I did a 3-color gradient with stamps.  I chose cupcakes because the colors of the whole thing reminded me of sweet treats.  Mmm!  I tried to do 2 different colors for the cupcakes but it didn't quite work out.  The black "wrapper" is too dark and the blue "icing" on the other is too light, but whatevs.  I still think it's such a fun mani that those things don't matter.
When it was all complete I wasn't really digging the shine so I used a matte top coat and then I was 100% happy with the whole mani.  By the way, I used like 5 colors for the marble.  Crazy right?  I just love how the whole "rainbow" came out though.

WHAT I USED:
Sinful Colors Unicorn (not seen) - pastel yellow base color
Color Club Wing Fling - pink
Wet 'n' Wild 9021-Orange - orange
China Glaze Lighthouse - yellow - it didn't really show up ):
Color Club Fly With Me - light green
Color Club Metamorphosis - teal green
Love & Beauty Black Glitter
Bundle Monster plate bm-14


Related Posts Plugin for WordPress, Blogger...