Tuesday, July 9, 2013

Product Review - essence Nail Art Stampy Set Review

So I've been using this a lot since I got it about 2 weeks ago and I think it's about time you all got in on the fun.  I'm going to a little review on the essence Nail Art Stampy Set which I picked up at Ulta for only $3.49.
So here is what it looks like in the box in case you want to go pick it up.  I think in every Ulta (as far as I've seen) all of the essence products are on an end cap somewhere near all the "drugstore brand" beauty products.  The photo on the right shows what comes with the set.  I was pretty impressed that the designs were not lame.    I would actually use more than one of them.  lol
This is the best photo of the plate I could get but I stamped them on a white piece of paper for you to really see the designs.  This was my first time using a stamper like the one in the set so I had a bit of trouble getting them on the paper completely as you can see with the heart and the polka dots.  The stamper is super squishy and didn't want to pick up all the way.  Eventually I got the hang of it.  All of the designs (after more practice) came out with no bald spots.  The only "problem" design is the butterfly in the center.  To me it looks like all the color ran together or it's smushed, but I feel like the lines should be more defined inside the wings.

Ready to see them on my nails?!
I tried to fit all of the designs on all my fingers (in no particular order) just so you could see what they look like.  As you can see some of them, like the ones on my middle finger didn't come out so well.  I tried them over and over on paper first and they kept coming up with missing spots.  I think the heart and bow are my favorites from the whole plate.
These are the other two designs.  Ummm ewww.  These look terrible.  I'm definitely no stamping expert (yes it is super crooked...lol) but for some reason the full design wouldn't pick up.  As for the hearts (yes those are hearts), they kept coming out smushed like that butterfly design.  I tried a different polish, a different stamper, and they just kept coming out ugly.  Another thing that I don't like about the set is that the scraper scratched the crap out of my plate so I threw it away.  Now I just use an old credit card.

Now for some real nail art!
There we go.  Finally something that looks halfway decent.  I used the polka dot and bow design from the plate and just free-handed the stripes on my pointer finger.

WHAT I USED:
Sinful Colors Unicorn - yellow
Zoya Cynthia - dark teal
Ulta High Roller - gold

So was this worth my money?  Yes!  I think if I had paid double the price I might even still be happy with it.  But considering that I won't use half of these designs, $3.49 was the perfect price.

Monday, July 8, 2013

Zoya Sandy Stripes

I had a little trouble with this mani (because I'm too impatient) but I still thought it was too cute to keep to myself.
I started with one, even coat of Zoya Zuza.  Can you all kinda see the fill line?  I'm gonna need a new bottle soon.  I just love this gorgeous shimmery turquoise color.  I knew I wanted to wear it, but I had to spice it up just a little.
So I applied my striping tape in a diagonal pattern and added two coats of Zoya Godiva for some texture.  I didn't wait for Zuza to dry completely so when I removed the tape, some came off but not too much.  And like I said, it's still too cute to keep to myself.

Have a great night!  (:

Sunday, July 7, 2013

Alter Ego Rust Bucket Owner

**I received this product complimentary for testing and review purposes from Alter Ego Nail Enamel**

I am super excited about this polish because it is my first ever Alter Ego polish.  I did give a couple away last year but I didn't get to keep any.  lol I received this polish straight from the maker, Cynthia.  She has relaunched HER STORE ON ETSY and reformulated all of her polishes with a new, lighter base and I'm here to tell you how it is.
All the Alter Ego's are named for occupations or actions so I got Rust Bucket Owner.  It is a rust colored orange/red (which didn't come out correctly) with brown, black, and scattered holographic glitter.  When I first opened it, I was so excited because it is so pretty.  I really wish I could capture the color correctly so you can see how dead on the color is to actual rust.
I had to go outside to get a better color and I almost nailed it...lol.  Nailed it!  Anyway, see the brick wall in the background?  See how close in color the polish is?  Yeah.  It's awesome!  (:

So the formula was amazing by the way.  I don't even know what I thought it was gonna be, but it wasn't this.  It turned out to be the easiest jelly polish that I've ever used.  I applied 3 coats for full opacity.  Oh but wait, as if that amazingness weren't enough, it dries semi-matte!  Yep!  My only suggestion for this polish is to wait until each coat dries completely or else you will need extra, extra dry time.  I didn't wait hardly any time between each coat and though I had absolutely no dragging or bald spots (thumbs up for Cynthia!), it did take a little while to dry.  Jellies are squishy and this one is definitely that.

Thank you so much to Cynthia for gifting this polish to me.  I really, really love it and I can't wait to try more polish from you.  If any of you, my dear readers, would like to get any Alter Ego polish to add to your ever-growing stash, just visit HER ETSY STORE and purchase any of her amazing full size bottles for just $8.50. Have a wonderful evening and rest up for the upcoming week.  See yaaaaaa!!!

Thursday, July 4, 2013

Happy Independence Day!

Just a quick post tonight because I'm sure you are all watching fireworks or popping your own.  I won't be because I have an early work day tomorrow.  Just be safe and be responsible this evening.  I want to see you all back here tomorrow.  (:
Basically I just recreated the American flag on my nails and eventhough my lines are a little crooked (I free-handed them), I think it came out pretty great.

WHAT I USED:
OPI Big Apple Red
Ulta Blue Streak
UO Silver Holo
Bundle Monster plate BM20

Happy 4th!!

Wednesday, July 3, 2013

Heart Stamps

Hey Everyone!  I'm not feeling very well today so I decided to skip Water Marble Wednesday.  Maybe I'll do one for you all tomorrow for July 4th...maybe.  I just don't really feel up to doing anything except sleeping, but unfortunately I still have to go to work.  However, I did manage to dig out this cute heart stamped mani.  Let me know what you think?
For this mani, I used 3 coats of a super streaky white.  Ugh!  It was all I had within arms reach.  lol Then I just chose 3 fun colors for the "drawn heart" stamp.  Enjoy!

WHAT I USED:
NYC French White Tip - white
Sinful Colors Pink - neon pink
China Glaze I'm With the Lifeguard - neon green
Hard Candy Beetle - shimmery heart
essence Stampy plate and stamper - bought it at Ulta for $3.49

Tuesday, July 2, 2013

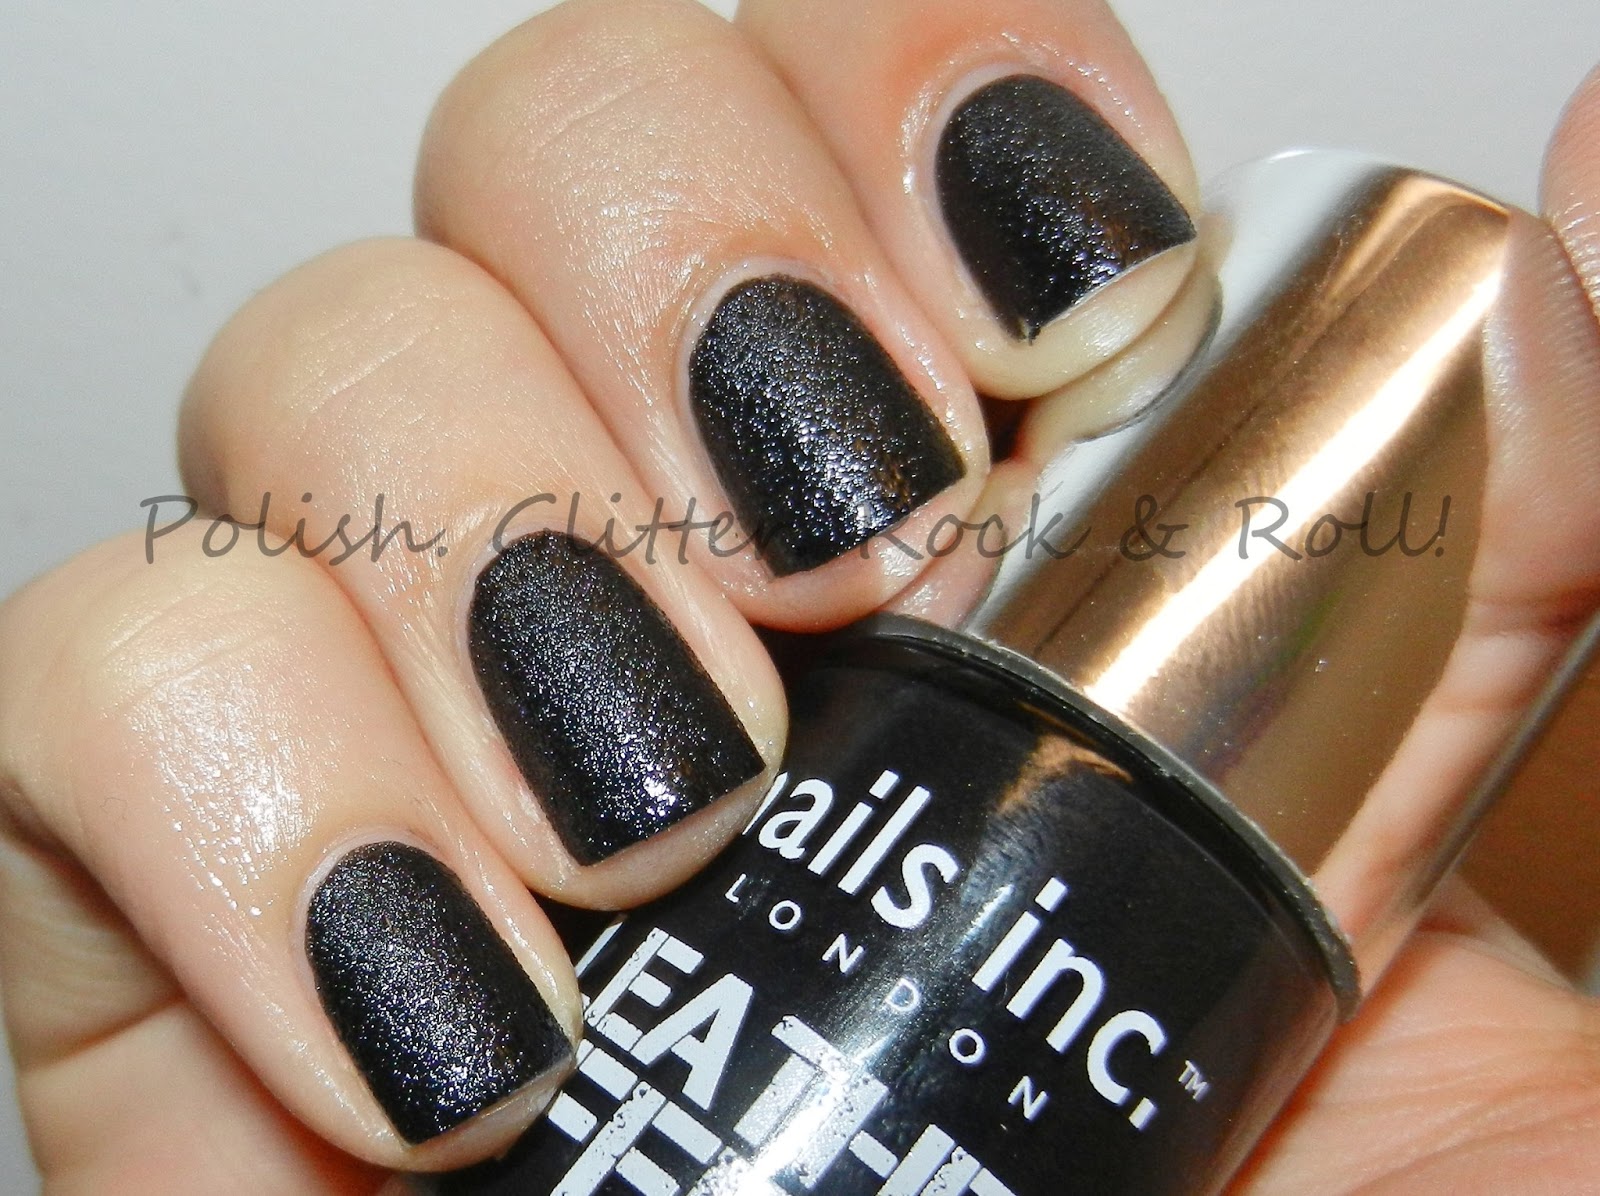
Nails Inc. Noho

Alright!  Since the hype on textures is still high but no one has swatched this in a little while, I thought I would be safe to bring it out.  In all actuality this photo has been sitting on my desktop just screaming to be used for a post.  lol
This is Noho, the black leather effect polish from Nails Inc.  OMG I love it!  I love that it really is different from the sands and pixiedusts, but it's still on trend because it's textured.  The texture on this one is a lot softer to the touch and doesn't dry completely matte.  It's like a semi-matte because it still has a little sheen to it.
The coverage is a little patchy on the first coat but it builds nicely and is opaque in 2 coats but I used and extra one just for the hell of it.  There is not top coat needed either.

This came in the Bling It On Rebel kit which also included some rhinestones, studs, and skull embellishments.  I chose to save these for a really badass mani in the future.  They are just so cute and I really don't want to lose one.  (:

Saturday, June 29, 2013

Beautiful Ruffian Mani

I won't keep you all very long because I assume it's just as beautiful where you are as it is here in Houston, so I'll just make it quick.

I have attempted this mani a few times and just never had a steady enough hand for it, but this time it worked out so well.  I did a ruffian mani!
Oooohhhh!  Isn't it wonderful?  I had lots of compliments on it for sure.  I know a lot of women, mainly the younger ones, think that mauve is such an "old lady" color - for lack of a better term.  But I on the other hand think that mauve can be so beautiful...like my mani!  (:

WHAT I USED:
Zoya Trixie - silver
Julep Joy - mauve

Wednesday, June 26, 2013

Water Marble Wednesday

Hooray for another Water Marble Wednesday!  I decided to do a random pattern on each nail.  I didn't even use the colors in the same order for each nail either.  They came out looking like neon wood grain to me.  lol You tell me what you think.
Oh and why did I add a bow?  I really don't know.  It was a better idea in my head and then it was stuck once I decided that it wasn't anymore.  Oh well!

WHAT I USED:
white base
Orly Oh Cabana Boy - pink
Color Club Lava Lamp - orange
popBeauty Loud Lime - green
Milani Blue Print - blue striper polish
China Glaze Creative Fantasy - purple

Tuesday, June 25, 2013

Pastel Braided Mani

So for the longest time, I couldn't figure out how to do this braided manicure.  I know that sounds silly, but I just couldn't.  I tried it with tape and it came out all wrong and then I tried it by myself and it was really wrong.  lol  Finally I gave in and looked up a photo tutorial (they are all over the internet) and could have kicked myself in the butt for not getting it the first (or second) time.  So here you have it.  My braided mani.
I have seen some tutorials where the person paints the entire nail first and then does the braid effect over it, but I didn't do mine that way.  I just painted a half moon of turquoise over my naked nail and then built the braid up from there.  I found it much easier and it dried faster since I didn't have so many layers of polish on.

I really love how the metallic silver pops out from the pastel colors.  I feel like this is a very Spring-y manicure but I guess it translates well into Summer, right?  I feel like I did a pretty good job on my lines too. I didn't use any tape so I just free-handed all the lines.
WHAT I USED:
Color Club Blue-ming - turquoise
Sinful Colors Sweet Tooth - purple
Zoya Trixie - silver

I'm really happy someone came up with this and then decided to do a tutorial for it otherwise I'd be left in the dark.  lol


Sunday, June 23, 2013

SoFlaJo Salmon-Chanted Evening

*This product was provided to me for review.*

Get it?!  LOL I love clever little names like this.  Anyway, thanks for stopping in today everyone.  I am so excited because I received a fun little sample of one of the polishes from SoFlaJo's new Summer collection, Wet Dreams.  There are 6 beautiful colors to choose from and I got Salmon-Chanted Evening.

Oh and before we get started, here is some information about her polishes.
"All SoFlaJo polishes are made from natural pigments and glitters with bases free of the chemicals Toluene, Formaldehyde Resin and Dibutyl Phthalate and Formaldehyde. All SoFlaJo polishes contain stainless steel mixing balls (and always have)."

Just in case you all wanted to know.  ;)
Salmon as I will so sweetly call it, is a gorgeous pewter color with a pink flash and holo micro shimmer.  The pink flash was bit tough for me to capture so I had to manipulate the photo above just a bit so you can see a slight tinge of pink.
My first coat had full coverage but I did two just to even out some of my brushstrokes and edges.  My first thought was that this polish was going to be a little sheer or "brushstroke-y" as are most of the polishes I have like this, but it applied effortlessly.  So pretty!
If you are interested in this shade or any others from the Wet Dreams collection, you can visit SoFlaJo.com for other blogger reviews and a link to her shop.  You can purchase a full size bottle for $10.00.

Have a wonderful Sunday!

Related Posts Plugin for WordPress, Blogger...